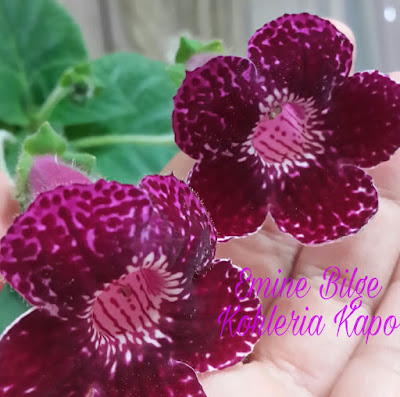
20 Haziran 2017 Salı

BİRKAÇ ADIMDA KOHLERİA BAKIMI


Kohleria için özet pratik bilgiler;

*Toprağını nemli tutun (yazın sık, kışın seyrek sulama yapmalısınız)

*Tül perde ardından güneş görsün (güneş ışığı yaprakları ısıtsın ama yakmasın)

*Kışın çok aşırı uzamışsa budama yapın (bitki uyurken budama yapın, bahara doğru uyanacaktır)

*Zaman zaman toprağı havalandırın (köklere zarar vermeden, uzun zaman sulamanın toprağı serleştirmesine izin vermeyin)

*Toprağı rizomla ve kökle dolmuşsa bir boy büyük saksıya alın. (Aşırı büyük saksıda çiçek açmayı erteleyebilir.)

*Kohleria'yı çok sevin 💙 💚 💛 💜

A FEW STEPS IN KOHLERIA CARE
practical summary information about kohleria
*keep the soil damp (you should water frequently in summer, less in winter)
*let it sunbathe on the back of tulle curtain (the sun should warm the leaves, not burn them)
*you may prune if it has extreme enlongation in the winter ( prune while the plant is sleeping, it will wake up to the spring)
*ventilate the soil from time to time(without hurting the roots, do not let watering the soil for a long time harden the soil.)

*you can change the vase into a bigger one if the vase is full of rhizomes and roots (it may postpone the blossoming in an extremely large vase)


25 Nisan 2017 Salı

KOHLERIA'YI SUDA KÖKLENDİRMEK


Kohleria çiçeğini toprağına bıraktığı rizomlarla çoğaltabileceğiniz gibi dalından da çoğaltabilirsiniz.

Bu yöntemi;
*çiçeğin dalı kırıldığında
*tepesi çok kalınlaşıp, kök kısmındaki sapının zayıf kaldığı zamanlarda
*fide ve rizom üretimini artırmak için
*anaç çiçeğin kendini yenilemesi için kullanabilirsiniz.

Üzerinde tomurcuk mu var? Hiç merak etmeyin ve korkmadan kesin. (Topraktan 5-10 cm yukarıdan kesebilirsiniz.) Kestiğiniz Tomurcuklar çiçek açmaya devam edecektir.

Köklenme süresi bulunduğu yerin hava sıcaklığına, nemine, mevsime göre değişebilir. Çünkü kohlerianın kış mevsiminde gelişimi yavaş ya da durgundur. İlkbahar ve yaz aylarında hızlı gelişim gösterir.

Köklendikten sonra, önceden ıslatılmış (asla çamur değil) toprağa dikim yapın. Toprak nemini kaybetmeden sulamayın. Toprağın da aşırı kurumasına izin vermeyin. Aşırı kurursa bazen suladığınızda toprak ıslanmadan suyu saksı dışına atabilir.

Ekildikten bir süre sonra gelişmeye ve toprak içinde rizom üretmeye devam eder.

Bol çiçekli mutlu günler 💙💚💛💜


ROOTING THE KOHLERIA IN THE WATER
You can augment the rhizomes that the kohleria leaves to the soil, you can multiply them on their braches as well.
You can use this technique when;
*the branche breaks
*the top of the plant is too thick but the root is weak
*you want to increase the producing of rhizomes and seedlings
*you want the mother flower to renew itself.
Does it have a gemma on it? Do not worry and cut it off with no hesitating. You can cut it off with 5-10 cm above from the soil. The cut gemmas will keep on blossoming.
The duration of rooting may depend on the heat of the place, humid or season. Because the progress of the kohleria in winter is slow or stabile. It increases in spring or summer.
After rooting, plant it into a wet soil, not into a mud. Do not water before the soil looses its humid. Do not let the soil dry too much. If it dries the soil may not get wet easily. After being planted, it starts growing up and produces new rhizomes in the soil.

Have a happy and flowery days...

8 Nisan 2017 Cumartesi

KOMŞU ÇATLATAN- JAPON KÜPESİ- KOHLERIA


Kohleria çiçeğinin dalları sarkmaya meyillidir. Saksısında kendi haline bırakırsanız salları aşağı doğru uzar gider.

Ben genelde bir uzun çöp dikip, ona dayanak yapıyorum. Böylece çiçekleri daha kolay görünüyor. Fidenin de kökü sallanmamış oluyor, kendini güvende hissetsin. Dileyen yüksek bir yere saksıyı asıp çiçeklerin güzelliğini öyle de seyredebilir...


Yerini beğenirse de çiçek açmaya devam eder tabi ki.

"Acaba ışığı yeterli mi" diye düşünüyorsanız fidenin bedeninin rengine bakacaksınız. Ne kadar koyu renkliyse o kadar güzel ışık alıyordur. Çok ışık + besin sürekli ve bol çiçek demek.

Işığı az ise dallarının rengi çok açık yeşil halini alır ve cılız büyür. Gölgede kaldıkça da cılız cılız uzar gider...


Ortamını nemlendirirseniz yaprakları da daha geniş hale gelecektir.

Nemli yağmur ormanlarında, yüksek bitkilerin altında süzülmüş ışık alan bir yerde olduğunu düşünün. Bu kohlerianın en sevdiği şeyler bir arada demektir. Yapraklarını daha çok nem kapabilmek için genişletecek, direk güneşe maruz kalmadığı için de yanmayacaktır. Tüylü ama zarif çiçeklerini yerine göre 8-10 ay sürekli açacak, göz dolduracaktır.

Besin konusuna da değinmek istiyorum.

Ben birkaç defa kullandım farklı farklı şeyler, ama zaman zaman fideyi yaktığım oldu. O yüzden temkinli yaklaşıyorum.

Afrika menekşesi besini veya Orkide besini alıp, 2 sulamaya 1 verirseniz güzel sonuç alınıyor.


Toprağını çamur sevmediği için, toprak kurudukça sulanmasını tavsiye ediyorum. Aşırı kurutup tümden çöl gibi de yaşatmayın tabi ki. Saksıyı elime alıp tartar gibi yapıyorum. Ağır ise sulamaya gerek yok. Bunun sebebi; bazen saksıdaki toprağın yüzeyinin kuruyup dibinin çok sulu hale gelmesi. Ağır bir saksının içinde halen su var demektir. Üst üste sık sulama çiçeğimizin nefes alamayan köklerini çürütüyor.


Az sudan ölmüyor ama çok sudan, çok büyük ihtimal ölüyor.Bu konuya da dikkat...


Aman diyeyim, çok besin asla çok çiçek demek değildir.


Varsa bir kohleria çiçeğiniz, bol çiçekleri olsun.

Yoksa en kısa sürede edinmenizi tavsiye ediyorum.
Vazgeçmesi gerçekten çok zor ...


JAPANESE EARRING- KOHLERIA
The branches of this flower are disposed to dangle. The braches dangle down if you let it grow.
I usually plant a stick near it so the flowers are seen easily. That makes the root stabile so that it can feel itself safer. You may hang the pot above and watch the beauty of the blossoms if you like.
It continues to blossom if it likes its place. If you wonder if the lighting was enough for it, you should check the color of the body. The darker it gets, the better the lighting is. The good lighting and nutrition means constant and plenty flowers.
If the lighting is less, the body and the branches turn into light green. It grows spindly as long as it stays in the shadow.
If you moisten the setting the leaves will become wider.
Imagine that the plant is in the humid rainforest with sunshine filtered beneath the higher plants. That means the most loved things are together for kohleria. It will widen its leaves in order to get more damp and it will not burn because of not being exposed to the sun directly. It will keep on blossoming for 8-10 months, depending on the conditions.
I want to mention about the nutrition, too. I have used different things for several times but unfortunately I did burn the seedling so I approach the subject deliberately.
The result is satisfying if you give nutrition of african violet or orchid per 2 irrigation.ı recommend you to water the soil if it is dry because kohleria does not like its soil mud. Do not over exsiccate as a desert of course. I take the pot as if I am weighing it. If it is heavy enough, no need to exsiccate. The reason is that sometimes the surface is the soil may seem dry but the deeper may be watery. This means there is still water in the soil.
It does not die because of the less water, but it probably does because of too much water. Attention to that.
The more nutrition does not mean the more blossom.
If you have a kohleria, may it be with lots of flowers.
If not, I recommend you to have as soon as possible.

Giving up on them is so hard..

6 Nisan 2017 Perşembe

Güzellik


Duruşu, bakışı bir başka çiçek bu...
Yerini severse, uygun koşulları sağlarsanız, neredeyse yıl boyu çiçek açıyor.
Hem de bir çiçek solmadan diğer tomurcuğu hazırlayarak bunu yapıyor.

Toprak çeşidi olarak gevşek ve süzek, aşırı çamur olmayan bir toprak seçmelisiniz.

sphagnum torfu kullanıyorum. İçine de perlit ve vermikülit eklediniz mi tamamdır.

Bunları bulamam derseniz, "Afrika menekşesi toprağı" olarak hazır toprak karışımlarından kullanabilirsiniz.

Bu tür toprak kullanırsanız, suyu tahliyesi kolay ve çamur olmadığından yetiştirmek çok daha kolay olur. Çünkü bu bitkinin susuzluktan ölmesi zor, ama aşırı sudan ölmesi kolay. Çünkü kökleri suda çürüyorlar.

Yazın daha sık, kışın daha az olmak üzer sulama yapıyorum.
Sulama sıklığı evinizin şartlarına göre değişir, bulunduğunuz şehrin şartlarına göre değişir.

"Ne zaman sulanır?" sorusunun cevabı şu; toprak nemini kaybettiğinde sulayın. Ama o zamana kadar erken sulama yapmayın. Toprağın kurumasına izin verin...

Özellikle nemli havası olan illerde yetiştirmek daha kolay.
Tropik özellikli yerleri tabi ki daha çok seviyor.
Ama havası kuru bir yerde yaşıyorsanız, fidenizi kalorifer peteğinden uzak tutarak, havasını nemlendirerek koruyabilirsiniz.
Örneğin; yanına bir ağzı açık kapta su bırakabilirsiniz.

Şimdilik bu kadar
Bol çiçekli günler...


facebook sayfam da işte burada


THE BEAUTY
This flower is something else with its attitude, glance..
If it loves its place and if you provide proper conditions it can blossom all year long. And it blossoms with preparing the new buds and without withering the others.
You should choose a loam soil
I personally use sphagnum peat with pearlite and vermiculite.
If you cannot find all these it is okay to use ready made mixed soil called "african violet soil" If you use that kind of soil it is easy to grow the plant because the drainage of the water is easy and it doesn't turn into mud quickly. It is hard for the plants to die because of the lack of water, but is easy because of excessive amount of water. The roots decay in the water.
I water my plants frequently in the summer but less in the winter. The frequency of watering the plants may depend on the conditions that the city you are in or the house you live in.
The answer of the question "when to water?" is; water the plant when the soil looses its wetness. Do Not water earlier until then, let the soil dry.
It is easy to grow kohleria especially in the cities with humid weather. It loves tropical places. But if you live in places with dry weather, you should keep your seedling away from the heater core and protect it by making the weather humid. For instance, you can put a glass of water near it.
This is it for now.

Take care.

31 Mart 2017 Cuma

KOHLERIA ALBUM

Bir kohleria albümü yapmasam olmazdı. 
Bu güzelliklerin fotoğrafını çekip ölümsüzleştirmemek olur mu? 

Keyifleri yerinde maşallah 💕


KOHLERIA ALBUM
I couldn't help not to make an album of kohleria.
How couldn't I thake photos and immortalize these beauties?

They are in good form. 

26 Mart 2017 Pazar

Rizomlar; Yavrular


Kohleria, toprağına rizom denilen yavrular üreterek çoğalır.
Resimde gördüğünüz Kohleria Tilda'nın rizomu. Topraktan sökülmediği sürece resimde görüldüğü gibi toprak üstüne ulaşmaya çalışır ve zamanla o da kocaman bir fide olabilir.

Peki Kohleria'yı bir rizom olarak edinirseniz nasıl ekeceksiniz?

Öncelikle toprağımızı 1-2 gün önceden ıslatıp nemli hale gelmesini sağlıyoruz.
Buraya dikkat; çamur değil, toprak nemli olmalı !

Bu sürede de rizomu suda bekletebilirsiniz.
Şuna da dikkat; uzun süre rizomu suda bekletmek çürümesine neden olur ve onun ölmesine sebep olursunız. Yalnızca 1 gün suda beklesin,uyansın yeterli. Günlerce bekletmeyin sakın.

Bu sürenin sonunda nemli toprağımızı saksımıza koyup, üzerine rizomu yatırıyoruz.

(Eğer rizom uzunsa 2ye bölüp de ekebilirsiniz. 1 cm'den kısa hale getirmeyin, sonuçta canlı bir yapı o. Eğer tecrübeli değilseniz ya da rizomun yedeği yoksa riske girmeyin derim)

Yatırdığınız rizomun üzerini 1cm kadar nemli toprakla örtün. Bir süre sonra rizom yavaş yavaş kök salacaktır. Toprak yüzüne yeşil yapraklarını çıkardığında saksıya toprak ekleyerek biraz daha derinde kalmasını, böylece daha iyi tutunmasını sağlayın.

1 püf noktası; eğer saksının üzerini streç film ile kapatır sera etkisi yaparsanız rizom daha hızlı köklenebilir. Ancak gözlemlemeyi ihmal etmeyin. Toprağınızda küflenme, minik organizmalar oluşuyorsa havalandırmayı tercih edin.

Bol çiçekli günler 💙💚💛💜


RHIZOMES; THE OFFSPRINGS
Kohleria multiplies by producing the offsprings to its soil called rhizomes.
the rhizome you see in the picture is kohleria tilda's rhizome. unless being uprooted from the soil, it tries to reach the surface of the soil and it can be a big seedling.
How will you plant the kohleria if you get it as a rhizome?
Firstly, wet the soil and make it dampy 1-2 days earlier. Attention here; the soil must be dampy, not mud!
meanwhile, You can steep the rhizome in.
Be aware that steeping the rhizome in too much may cause rot and death of the rhizome. Let it wait in the water just for one day. not for days.
At the end of the duration, put the dampy soil in the flowerpot and lay the rhizome on the soil. If the rhizome is long, you can cut it into two. Do not cut it shorter than 1 cm because it is alive. (If you are not experienced i reccomend you not to take risks.)
Cover the rhizome with 1 cm-thickness dampy soil. After a while the rhizome will take root slowly. When it comes up with its green leaves, add some soil on it. This makes it stay in  deeper so it holds on better.

The key point; if you cover the pot with stretch film and provide the greenhouse effect, the rhizom may root faster. Do not neglect to observe. You may want to ventilate the soil if you see little microorganisms or mold. 

19 Mart 2017 Pazar

KOHLERIA HAKKINDA BİR BLOG

Son birkaç senedir evimi güzelleştirmesi bir yana, benim için tutku haline gelen çiçeğim için bir blog açmak şart oldu.Hayırlı uğurlu olsun.
Bu güzelliğin çeşitlerini, fotoğraflarını, bakımını burada paylaşmak istiyorum.

Sevgiler 


facebook sayfam işte burada


A BLOG ABOUT KOHLERIA
Besides embellishing my home, it is essential now to open a blog for my flower which is a passion for me. 
I want to share variations, photos and maintenances of this beauty here.

Love..